


Building Wi-Fi Labs with Inexpensive Raspberry Pi Devices - Part 2
By Joseph Bullock On 04/01/2024
In this continuation of Building Wi-Fi Labs with Inexpensive Raspberry Pi Devices we will focus on using the Raspberry Pi to participate as a Wireless Station (STA) and Access Point (AP).
Pi as Wi-Fi Station
We have performed a wireless scan, so the next logical step is we want our Pi to connect to a wireless network we found in the wireless scan. First reboot the Pi to clear out any configurations that could be lingering effects from the commands we ran above. The wireless radio was put into monitor mode and multiple services were stopped. It is best to get the Pi back into a safe known state to move forward.
wpa_supplicant is the name of the wireless client (STA) on the Raspberry Pi. It is a service that typically runs in the background maintaining a connection to a wireless network. We must let wpa_supplicant know certain information, such as the SSID, PSK and Country we intend to us to connect to a Wi-Fi network. This is simple enough with a handful of lines in a configuration file.
Edit the WPA Supplicant configuration file
sudo nano /etc/wpa_supplicant/wpa_supplicant.conf
.png)
Unfortunately, WPA Supplicant does not log data anywhere, so it is difficult to debug if a connection has failed and why. The wpa supplicant is a service that runs in the background by default, but it is relatively easy to run it in the foreground and look at debugging information with the following commands
sudo systemctl stop NetworkManager.service
sudo systemctl stop wpa_supplicant.service
sudo wpa_supplicant -c/etc/wpa_supplicant/wpa_supplicant.conf -iwlan0
Successful Association
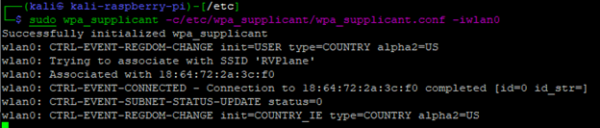
This tells us a few key things: the SSID we are associated with, the BSSID and the connection was successful.
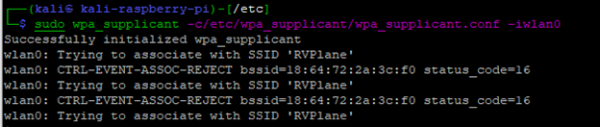
Unsuccessful Association due to bad PSK
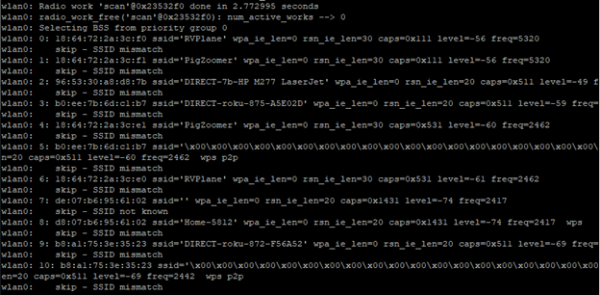
Unsuccessful Association due to an incorrect or out of range SSID.

When a SSID or PSK is incorrect, it can be difficult to determine why, as very little information is presented in the output of wpa_supplicant. If you append the -dd parameter (increase debugging verbosity), a large amount of detailed log data will be returned from wpa_supplicant
Running with verbose logging
sudo wpa_supplicant -c/etc/wpa_supplicant/wpa_supplicant.conf -iwlan0 -dd
The wpa_supplicant running as an application is great for debugging, but it's somewhat unnecessary once a connection to a Wi-Fi network has been successful established. Plus it would be nice to use the foreground to run other applications. We will add two additional parameters to the wpa_supplicant command line
- -B Instructs wpa_supplicant to run in the background as a daemon
- -f <logfile> Any output that would have been logged to the screen will be redirected to the logfile specified.
sudo wpa_supplicant -c/etc/wpa_supplicant/wpa_supplicant.conf -iwlan0 -B -f /var/log/wpa_supplicant.log
Now the wpa_supplicant will run in the background. To kill it, use the following command
sudo killall -9 wpa_supplicant
In order to see the logged output of wpa_supplicant, you will need to look at the contents of the log file in /var/log/wpa_supplicant.log
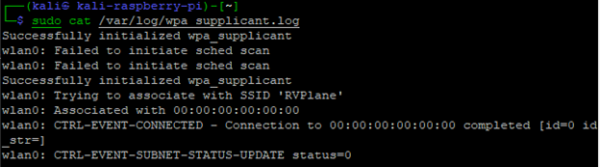
wpa_supplicant log file output
sudo cat /var/log/wpa_supplicant.log
With wpa_supplicant handling all of the STA functionality running in the background, the next step is to request an IP address from the DHCP server and see what IP has been lease. The following two commands enable the DHCP client and report on the interface IP's
dhclient -i wlan0
ifconfig wlan0
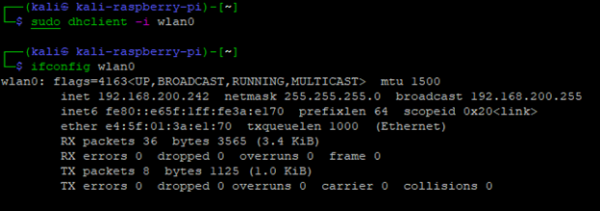
From the output of ifconfig, the raspberry pi now has a DHCP IP address of 192.168.200.242
Raspberry Pi as an Access Point
Dare I say we have saved the best for last? Everything we have covered so far can easily be performed on really any modern OS out there without needing special hardware use freely available software. Kali Linux comes with the hostapd utility which can make most recognized Linux radios an 802.11 Wi-Fi access point with just a configuration file and an executable running.
We can easily create a simple WLAN with a few lines in a configuration file. In the following example, we will make an SSID "wifi_ssid" with the PSK "wifi_password" running on channel 6 in the 2.4 GHz frequency range using 802.11g.
sudo nano /etc/hostapd/hostapd.conf
.png)
# Now to stop all other processes which could cause interference:
sudo systemctl stop NetworkManager.service
sudo systemctl stop wpa_supplicant.service
sudo killall -9 wpa_supplicant
Connect to the Pi with the serial interface or keyboard/display before proceeding. Setting up the bridge will disconnect network traffic from the ethernet port temporarily.
# Setup a bridge to connect the ethernet port to the wlan0 interface.
sudo ip link add br0 type bridge
sudo ip link set dev eth0 master br0
sudo ip link set br0 up
sudo ifconfig eth0 0.0.0.0
sudo dhclient br0
ifconfig br0
Start HostAPD
sudo hostapd /etc/hostapd/hostapd.conf
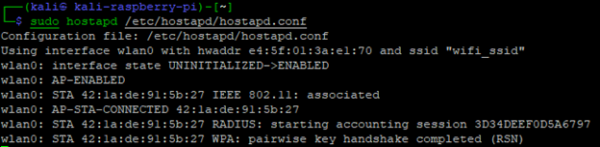
The output of HostAPD shows the wifi_ssid WLAN being initialized with the e4:5f:01:3a:e1:70 BSSID. It also shows a STA connected, which is my phone. My phone shows I am connected to the WLAN and received an IP address within my local network range, 192.168.200.x.
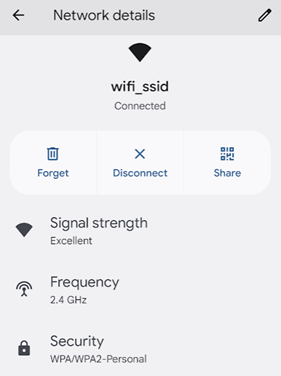
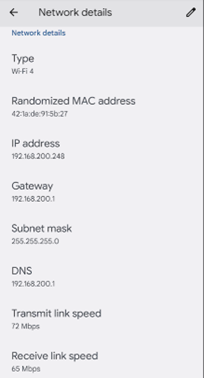
Android Phone showing WLAN Successfully connected with IP
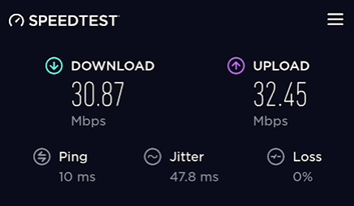
Performing a speedtest shows descent results. The radio on the Raspberry Pi is somewhat limited, so don't expect it to be competative with enterprise AP speeds.
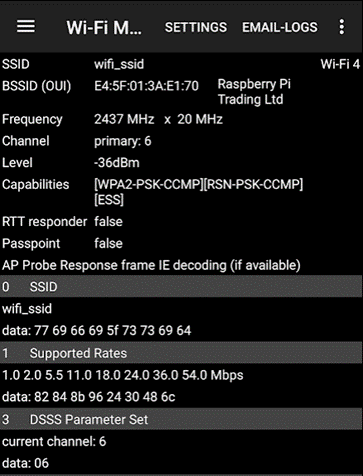
The Aruba Utilities app on my phone confirms the BSSID is set properly, and the connection is on channel 6.
The above hostapd configuration is meant to be simple – 802.11g isn't all that exciting of a technology. Below is a much more exciting configuration for 802.11ac with an 80 Mhz wide channel. From looking at the configuration file, you can see it is much more complicated than the first example.
/etc/hostapd.conf
.png)
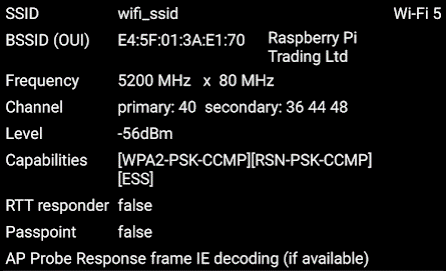
Aruba Utilities confirms an 80 Mhz wide channel using channels 36-48 with 40 being the primary channel.
wpa_supplicant and hostapd beyond the lab
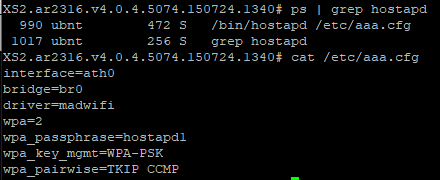
The two tools covered in this article for connecting to Wi-Fi access points (wpa_supplicant) and a tool for creating a software access point (hostapd) are not just limited to lab environments. Ubiquiti, Inc. uses both tools in their line of wireless products. I run a few NanoStation2 2.4 Mhz wireless access points which have SSH access to the Linux subsystem. By simply running the process status (ps) command, it shows hostapd and wpa_supplicant running, along with their configuration file. Viewing the configuration file shows something that should look quite familiar – configurations very similar to what we implemented above.
hostapd running on an Ubiquiti NanoStation2
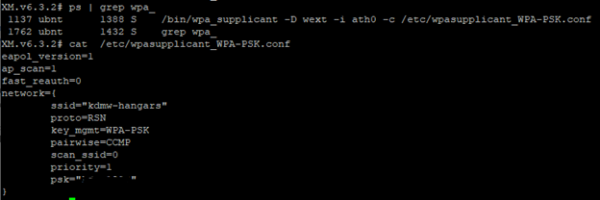
wpa_supplicant running on an Ubiquiti NanoStation2
These tools should not be seen as just something used for labs – they are hardened supported products that enterprise Wi-Fi vendors use at their core.
Next Steps
This article attempted to touch on the possibilities of the built-in radio and the capabilities of the Raspberry Pi. The wpa_supplicant and hostapd tools have many more features and configurations that can be applied. The built-in radio of the Raspberry Pi is limited to some of its features, functionality, and range. The Wi-Fi antenna on the pi is just a trace run on the PCB, clearly not as good as a proper antenna that many USB radios have. The USB radios have many more robust features that the onboard radio doesn't. There are many articles on the internet that go into depth about the USB radios that are compatible with the Pi and hostapd/wpa_supplicant specific configurations to get the most out of them.
Blog Disclaimer: The opinions expressed within these blog posts are solely the author’s and do not reflect the opinions and beliefs of the Certitrek, CWNP or its affiliates.