AirCheck: A Follow Up
By CWNP On 01/05/2011 - 23 Comments
Back in the early Spring when the Michigan snow clung to the ground like a two-year old to mommy’s leg, I wrote about Fluke Networks’ new handheld network analysis tool, AirCheck. My original test product for that article was an early alpha unit that was returned to Fluke Networks after a hardware bug (it was fixed) was discovered. Ever since, I’ve had a slight nagging feeling that I left the intro blog a little short and lacking in visual material. I find it apt timing that a similar product was released back in December, which could make for some interesting discussion in the comments section. Anyway, to make good after my initial limitations, here’s a follow-up that demonstrates the device, its features, and its interface.
If you missed my first article and Fluke Networks’ press releases, you should know that AirCheck is a dedicated hardware network analysis and monitoring tool for frontline IT techs. These are the individuals that aren’t likely to study for CWNA and then master a tool like AirMagnet WiFi Analyzer, so they need something that is quick and easy to use that covers the basics of troubleshooting and surveying. With that purpose in mind, AirCheck is feature rich.
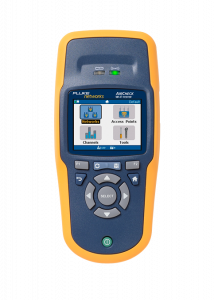
I have to mention that AirCheck has the fastest boot time of any handheld device I’ve ever used, with the exception, possibly, of a calculator. Push the power button and the device is ready to use in less than 3 seconds. After the imperceptible boot, the user arrives at the Home menu. The Home screen has four different navigation menus and provides additional information on the interface top and bottom, including the channel being scanned, the number of APs that have been discovered, the current profile (top right), the battery status, AC power or USB connectivity, and whether an external antenna is connected (in this case, it is).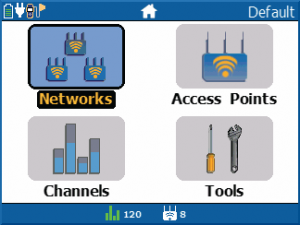
From the Networks menu, you’ll see a list of discovered SSIDs and associated security, channel, and PHY. Drill down even further to see details for each AP that is broadcasting that SSID.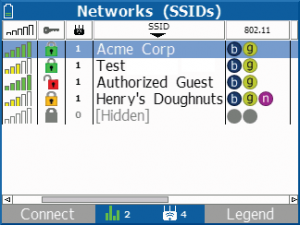
Or, from the Home menu, select the Access Points menu to see a list of APs, which looks similar to the list of networks. Select an AP and you get more helpful info about that AP, such as signal, noise, SNR (these three metrics are color-coded according to preset thresholds), and a handful of other data including 802.11n details (channel width, max MCS rate, protection mode, etc.).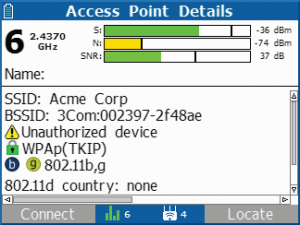
To connect to a network, you’ll have to load a previously created (out of band) profile for that network. When you do connect, basic network connectivity testing is done automatically. As you can see in the graphic, the pings to www.google.com failed, though pings to the local network were successful. WAN connectivity or DNS problem perhaps?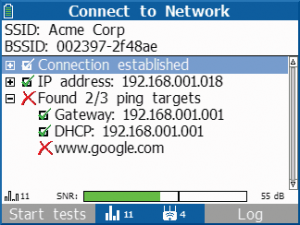
For further testing, you’ll have the option to select a network node (such as gateway, DHCP server, custom IP address, URL, etc.) and begin a continuous ping.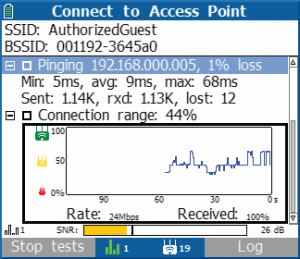
If your employees don’t abide by your security policy that forbids home Wi-Fi routers, you can track their rogues with the AP location feature and smack their hand when you find them. There’s an external antenna connector on the unit to aid in this purpose.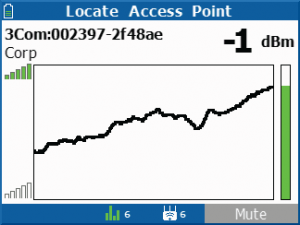
For a more global environmental analysis, from the Home menu, drill down on the Channels menu where you’ll see a spread of channels, color-coded according to the configured regulatory domain (black is within regulatory domain, red is not). The Channel Usage menu displays the utilization (Blue is Wi-Fi, grey is non-Wi-Fi) of a channel as well as the number of APs operating there.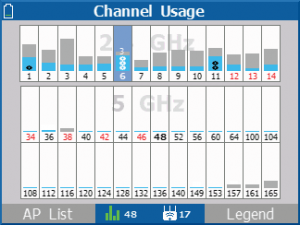
Drill down on a specific channel to see the usage details spelled out.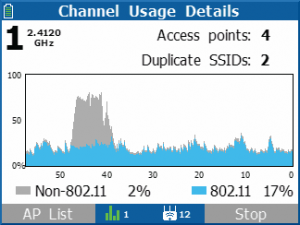
From the Home menu, you can also enter the Tools menu, which is comprised mostly of configuration options like language, country code, profile management, time/date, etc. From the Tools menu, you can also enter a client scanning mode where AirCheck camps out on each channel for a slightly longer interval, recording all client probe requests.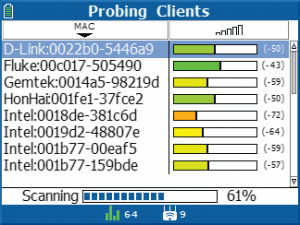
So there's your overview of the interface and functionality.
The hits:
- One of the benefits of dedicated, purpose-built devices like AirCheck is that hardware components are optimized for the task. Where a smartphone or other mobile device has competing priorities (such as form factor, aesthetics, consumer Wi-Fi needs, power conservation), a purpose-built Wi-Fi troubleshooting product can use the ideal WLAN radio and antenna hardware for the task, and then optimize the lesser priorities within the constraints of optimized WLAN hardware. Along those lines, AirCheck is equipped with an Atheros dual-band AR9160 (3x3 802.11n with 2 spatial streams) radio. If the internal omni antennas don’t do it for you, there’s an external antenna connector (input only) for rogue location discovery.
- The new AirCheck unit offered me a quick reminder that the interface is very intuitive and the buttons are pleasantly tactile. In the mobile handheld world, our lives are quickly being overrun by touch interfaces, so it is not surprising that physical buttons feel so incredibly easy to use and responsive.
- This device includes all the functions (and more) necessary for the intended customer audience. Feature support is very good.
In addition to those hits, there are a few misses:
- The unit is a bit bulky to carry around all the time (won’t exactly fit in your pocket).
- Requires out-of-band profile creation for connectivity to networks. The design idea in play here is that frontline technicians may not be administrative users with control over security policies and credentials, so they shouldn’t be able to create new connectivity profiles directly from the device. This is good for security, but in my opinion, a better design technique would have been a lock feature on the device that allows/prevents profile creation and management functions. Currently, admins can lock certain connectivity profiles so that non-admins can’t use them, but profile creation always requires a PC with the AirCheck management software.
Again, don’t misunderstand the intended customer market here. This is a fitting product for frontline support and simple troubleshooting tasks, but it’s not designed to replace professional Wi-Fi survey and analysis tools. It delivers on its intended use very well.
For more information from Fluke Networks, check out their AirCheck resources: <spanstyle="text-decoration: underline;">www.flukenetworks.com/AirCheckResources
List price is $1995.
Blog Disclaimer: The opinions expressed within these blog posts are solely the author’s and do not reflect the opinions and beliefs of the Certitrek, CWNP or its affiliates.


0 Responses to AirCheck: A Follow Up
Subscribe by EmailThere are no comments yet.
<< prev - comments page 1 of 1 - next >>
Leave a Reply
Please login or sign-up to add your comment.