


Building Wi-Fi Labs with Inexpensive Raspberry Pi Devices - Part 1
By Joseph Bullock On 04/01/2024
The Raspberry Pi is extremely powerful in its Wi-Fi capabilities. In this article, we will walk through the following configurations of the Pi:
- Wireless Scanner
- Wireless Network Sniffer
- Wireless Station (STA)
- Access Point (AP)
The Raspberry Pi is an inexpensive small form factor fully functional computer about the size of a deck of cards. One of the latest models, the Raspberry Pi 4, has a quad core ARM 64 bit CPU, 2/4 GB of RAM, 4 USB ports, 2 HDMI ports, an ethernet port and a built in 2.4 GHz and 5 GHz IEEE 802.11ac wireless radio. It also has a 40 pin general I/O connector, in which a special daughterboard (named Hat's in the Pi world) can be installed to allow the Raspberry Pi to be powered via PoE (It is powered by a USB-C Power source otherwise). The price point (pre 2021 parts shortage) was $35.
The Raspberry Pi is extremely powerful in its Wi-Fi capabilities. In this article we will walk through the following configurations of the Pi:
1) Wireless Scanner
2) Wireless Network Sniffer
3) Wireless Station (STA)
4) Access Point (AP)
Minimum requirements for this lab:
• Raspberry Pi 4 (2 or 4 GB model)
• Existing Wireless WPA/WPA2-Personal Network (2.4 or 5 Ghz)
• Existing Wired Ethernet network
• Both above networks with DHCP and internet access
• microSD Card 16GB or larger
• microSD Card reader/writer
• HDMI Monitor with a micro HDMI Cable
• USB Keyboard (and optionally a USB mouse)
• USB-C Cable to provide power
To get started, we will need an Operating System image and a method to copy it to a boot device (microSD or USB Drive). For this article, I am going to assume you will be using a microSD as it is more universal than a USB boot drive for different hardware revisions of the Pi. Any microSD card larger than 16GB should be more than sufficient.
The Pi boots off of a microSD card, so the first step is to load an operating system onto it. There are many OS's to choose from for the Pi, for this lab we are using Kali Linux as it out of the box supports nearly all the features we will need. Start by downloading Kali Linux from the following link: https://www.kali.org/get-kali/#kali-arm
Most likely you will need the Raspberry Pi 2, 3, 4 and 400 (32-bit) download (approximately 2 GB). The downloaded OS needs to be installed onto the microSD card. This is dependent on the platform of the computer you are using to write data to the storage device. I recommend balenaEtcher as it is one of the easier tools out there, multiplatform (Windows, Mac, Linux) and it can write multiple microSD cards simultaneously, which is a time saver when it comes to setting up a lab. Using the tool is quite straightforward – select the source image you downloaded above, select the destination device(s) and then wait 10 or so minutes for the data to be written and verified.
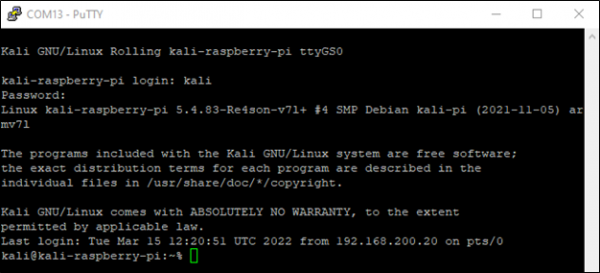
Insert the microSD card into the Pi, connect it to a HDMI monitor and keyboard (mouse optionally), connect the ethernet cable, apply power (via USB-C) and you should see it booting. The Pi may reboot, as it resizes its image to take advantage of the full storage space on the microSD. Once you see a login prompt, log into the Pi with the default login credentials, username "kali", password "kali".
As a network engineer, I don't like to interact with many devices by plugging a monitor and keyboard into them. Also, the Pi's IP address can change every time I boot it up, or plug it into another network. There would be no easy way to know what the new IP is without a monitor and keyboard. A serial console interface would be really nice so I could access the Pi easier. The USB-C port on the Pi can be configured as to appear to the computer it's connected to via USB as a USB Serial port. This will make the Pi appear as a USB serial port to your host system and powered – by one cable!
Configuring the Pi to be accessed via a USB serial is easily accomplished in three simple steps. Editing files is outside of the scope of this article, but there are multiple good sources on how to use vi or nano to edit files. This step is completely optional – but it is here to make it easier for you if you prefer to interact with your Pi via a serial connection instead of a monitor and keyboard or SSH.
- Enable superuser mode sudo su
- Edit sudo nano /boot/config.txt and append the following to the end of the file on its own line: dtoverlay=dwc2
- Edit nano /boot/cmdline.txt and append the following to the end of the first line: modules-load=dwc2,g_serial
- Associate the gadget serial port, ttyGS0, to a console: sudo systemctl is-active getty@ttyGS0.service
- Reboot- The Pi should appear as a USB serial device, and when you connect it should prompt you for your username and password (kali / kali).
Pi Radio Capabilities
Every radio has certain limitations as related to its capabilities. Before exploring how to use the radio in the Pi, it is important to know what to expect. For example, if the radio only supported 2.4 GHz channels, we would want to know before trying to figure out why it can't connect to an 802.11AC network. The iw phy command dumps the capabilities of the internal radio of the Pi, including, but not limited to, Supported Channels/Frequencies, Ciphers, Power Save, Channel Widths, Bitrates, VHT Spatial Streams, and more.
.png)
Partial output of iwlist wlan0
Just from this snippet of the output, you can see it supports 20, 40, and 80 Mhz wide channels, but not 160 or 80+80.
Wireless Scanning
The Kali Linux distribution comes with several useful tools for scanning wireless networks.
NetworkManager
NetworkManager is a system service within Linux that keeps connectivity to networks online. It offers the simplest method of performing a passive wireless scan. Within a few seconds it reports back, in sorted order from strongest to weakest signal, BSSID, SSID, Channel, Data Rate, Signal Strength, and Security Suites. The nmcli dev wifi command reports back beacons received by NetworkManager within the past 30 seconds.
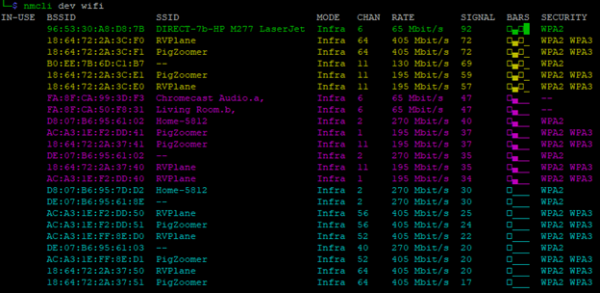
nmcli dev wifi output
airodump-ng
NetworkManager provides a quick snapshot of the wireless network, but only for the past 30 seconds. Airodump-ng takes the network scan to the next level. Airodump-ng is part of the Aircrack-ng suite of Wi-Fi monitoring, capturing, attacking, cracking, and testing toolset. Airodump-ng is a capture tool, and we will use it to capture and report beacon and association information.
To use the Airodump-ng tool, the NetworkManager and WPA Supplicant services must be stopped to use the WLAN0 internal radio for in monitor mode. Stopping means the service will not attempt to restart, however if the Pi is rebooted, the services will still start automatically. As this is a lab exercise, we will sometimes need to manually disable these services as different labs will require the onboard radio to be placed into monitor mode. If we disabled the NetworkManager service, the nmcli tool that we used above would not work. The following are the steps needed to stop the NetworkManaget and WPA Supplicant services and configure the internal radio to run in monitor mode.
.png)
After stopping the system services and enabling monitor mode, run the sudo airodump-ng mon0 command.
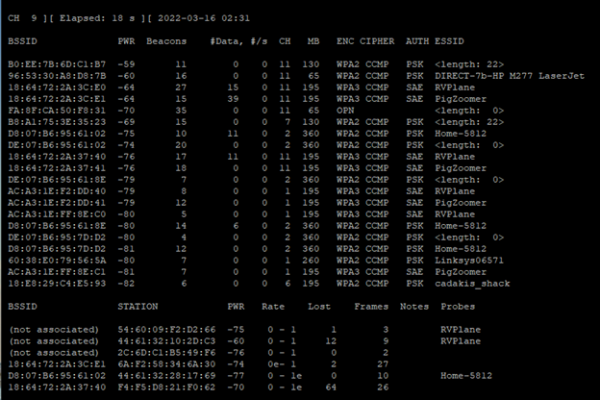
sudo airodump-ng mon0
airodump-ng performs a continuous scan of the available Wi-Fi networks. It has a lot in common with the nmcli network scanner, as it shows SSID, BSSID, channel, encryption, and speed (MB). However, airodump-ng is constantly scanning (outside of the 30 second retention of nmcli). This gives us a few more BSSID's that nmcli did not pick up on (for example cadakis_shack and Linksys06571 were not in the nmcli scan results). Additionally, airodump scans the relationships between stations and their BSSID. In the lower position of the real-time report, it shows STA MAC address and if they are associated with a BSSID.
A keen eye would notice only 2.4 Ghz channels are being reported. A keener eye would see Home-5812 is using channels 2 and causing adjacent channel interference (ACI) with channel 1 and 6! By default, airodump-ng when run without any parameters other than the monitor interface will only scan 2.4 GHz channels. To scan the 5 GHz channels, the –band a parameter can be appended
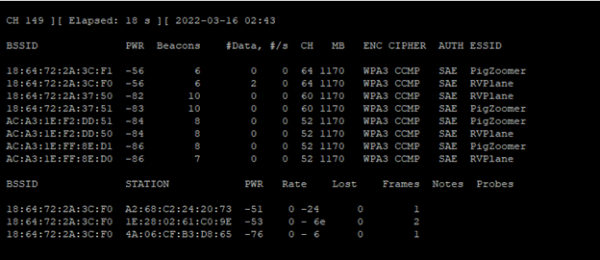
sudo airodump-ng mon0 --band a
Now, we have a better picture of the 5 GHz channels and their associated AP's and STA's. In the upper left corner, you will see CH 149. This number is constantly changing to scan a channel. A radio cannot scan all channels simultaneously as it must tune into the frequency of a particular channel, listen for a short duration, and then move onto to another channel to monitor. This all takes time and leaves the possibility of missing capturing data. Airodump-ng has the ability to listen only on a single channel. For the next scan, we will monitor channel 64 and no other channels.
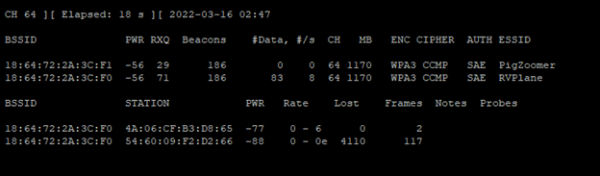
sudo airodump-ng mon0 --band a -c 64
This scan was run for the same duration as the previous scan – 18 seconds. However, look how much more data was received. For BSSID 18:64:72:2A:3C:F0, only 6 beacons were received within 18 seconds, compared to 186 when only a single channel was scanned. With the beacon interval typically set at 1024 time units (102.4ms), 186 beacons would seem like a much more reasonable number of beacons expected to be broadcasted in 18 seconds (roughly 10/second) than 6!
The last scan to touch on is filtering by SSID. This is accomplished by appending the --essid <SSID Name> parameter to airodump-ng:
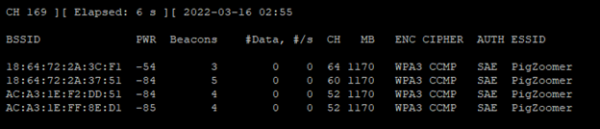
sudo airodump-ng mon0 --band a --essid PigZoomer
iwlist
iwlist scans available wireless networks much like nmcli and airodump-ng, however, it offers much more details information on a per-BSSID basis. It is not as easy to read ad the outputs of nmcli and airodump-ng, but this tool would be something you would run after you determine which Wi-Fi network to gather further information about. To run iwlist, the monitor interface will need to be disabled (sudo ifconfig mon0 down) and both NetworkManager and WPA Supplicant services will need to be stopped.
sudo systemctl stop NetworkManager.service
sudo systemctl stop wpa_supplicant.service
sudo ifconfig mon0 down
sudo iwlist wlan0 scan
.png)
Partial output of sudo iwlist wlan0 scan
It's quite easy to see there is a lot more information on a per-BSSID basis iwlist provides – supported bitrates, Information Elements (IE's), Frequencies, and more. iwlist doesn't provide the best user interface for running a scan, it does provide superior details of the beacon frame information.
Now think big picture – take this to the next level. With some simple scripting, you could make the Pi scan the wireless network at a set interval (cron job) and at each scan report check all BSSID and SSID's accessible on your network. It could then compare these values with expected BSSID and SSID's for your network and email any rogue SSID or BSSID's. $40 Wireless IDS!
TCP/IP Network Scanning Utilities
Kali Linux not only has utilities to scan Wi-Fi 802.11 traffic, but also has a handful of utilities to scan IP networks. These tools can come in handy to discover other L2/L3 devices once connected to a Wi-Fi network.
arp-scan
The arp-scan utility sends ARP requests packets to every host on the specified interface. It then processes the responses (IP to MAC relationship) and for known MAC OUI's, displays the vendor.

sudo arp-scan --interface=wlan0 --localnet
nmap
The nmap utility probes networks for discovery, open ports, operating systems and a number of other attributes of IP devices on a network. It works by scanning all IP addresses passed, scans each one to see if it is online (at the layer 3 level, unlike layer 2 like arp-scan), and interrogates online hosts. The sudo nmap -ss -O 192.168.200.0/24
command will attempt to learn the OS of all devices on the 192.168.200.0/24 network.
Grab some popcorn for this one. Unlike everything else we have done, this utility takes quite a bit of time as it scans all known ports on all IP addresses within the given range.
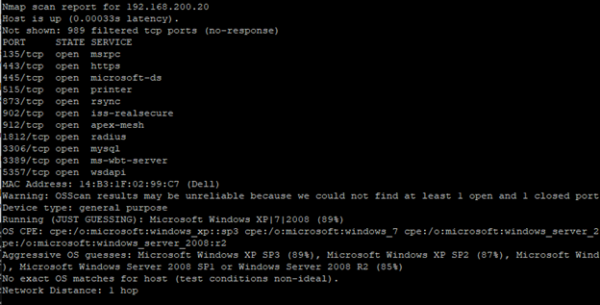
sudo nmap -ss -O 192.168.200.0/24
This is just a single result of the nmap scan I ran. A lot of information was divulged with the scan – the manufacturer of the device (Dell), all of the ports/services open, and a best guess at the OS (It was actually wrong here, I am running Windows 10 with all updates).
tcpdump
The tcpdump utility is a network traffic capture utility. You can think of is like a command line version of Wireshark. Don't expect tcpdump to be the magical utility which allows you to see all information broadcasted across your WLAN. It will only show the information received and sent to the wireless adapter. If client isolation is enabled on the Wi-Fi network, other Wi-Fi client data (broadcast included) may be restricted. Use the command sudo tcpdump -i wlan0 port not 22 to capture all traffic except for port 22. Why did we make an exception for port 22? If we are SSH'd into the Pi, a majority of the traffic from tcpdump would be from the SSH session. For a better scan, we should omit our self-generated SSH traffic.
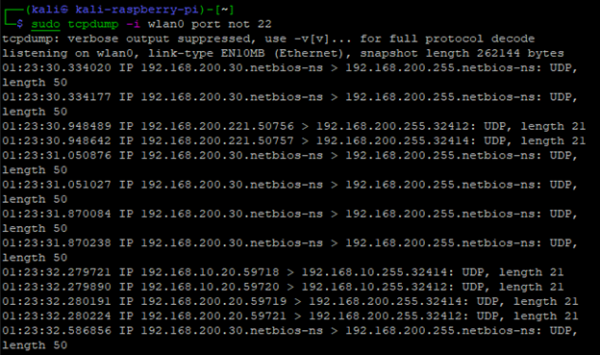
sudo tcpdump -i wlan0 port not 22
From running tcpdump for a short period of time, we can see there is at least one Windows host on the 192.168.200.0/24 network, as you can see 192.168.200.30 broadcasting UDP packets for netbios-ns.
Speed Test
What would a network analyzer be without a speedtest? Unfortunately, this seems to be the only test most people are interested in. I definitely fall into this category as anytime I receive an upgrade from my ISP, a speed test is one of the first utilities I run. The Pi does not make the best speed tester, due to limited CPU processing. Most speed tests run off of HTTPS streams, which incurs CPU intensive processing for decrypting data. If the speedtest come up a little lackluster, if could be the hardware limitations of the Pi.
The Kali Linux distribution comes with so many utilities, except the speedtest! This is no real worry as it's very easy to install with the following command:
sudo apt install speedtest-cli -y
To run it is even easier – just type speedtest and the utility will automatically find the closest server and run an upload/download bandwidth test against it.
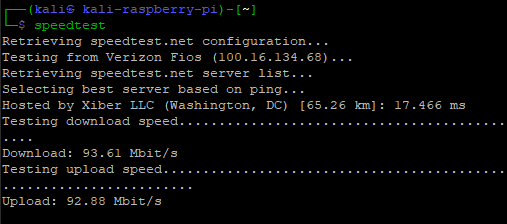
Speedtest
Tagged with: cwnp, raspberry pi, wifi lab, part 1
Blog Disclaimer: The opinions expressed within these blog posts are solely the author’s and do not reflect the opinions and beliefs of the Certitrek, CWNP or its affiliates.